Angular 导航
本指南介绍了路由如何在使用 Ionic 和 Angular 构建的应用中工作。
🌐 This guide covers how routing works in an app built with Ionic and Angular.
Angular 路由是 Angular 应用中最重要的库之一。没有它,应用将是单视图/单上下文应用,或者无法在浏览器重新加载时保持导航状态。使用 Angular 路由,我们可以创建可链接且具有丰富动画的应用(当然,当与 Ionic 配合使用时)。让我们来看一下 Angular 路由的基础知识,以及如何为 Ionic 应用配置它。
🌐 The Angular Router is one of the most important libraries in an Angular application. Without it, apps would be single view/single context apps or would not be able to maintain their navigation state on browser reloads. With Angular Router, we can create rich apps that are linkable and have rich animations (when paired with Ionic of course). Let's look at the basics of the Angular Router and how we can configure it for Ionic apps.
简单的路由
🌐 A simple Route
对于大多数应用,通常需要某种路由。最基本的配置看起来大致如下:
🌐 For most apps, having some sort of route is often required. The most basic configuration looks a bit like this:
import { RouterModule } from '@angular/router';

@NgModule({
  imports: [
  ...
  RouterModule.forRoot([
    { path: '', component: LoginComponent },
    { path: 'detail', component: DetailComponent },
  ])
  ],
})
这里最简单的解析是路径/组件查找。当我们的应用加载时,路由通过读取用户尝试加载的 URL 来启动工作。在我们的示例中,我们的路由查找 '',这本质上是我们的索引路由。因此,对于这个,我们加载 LoginComponent。相当直接。将路径与组件匹配的这种模式会继续应用于路由配置中的每一个条目。但如果我们想在初次加载时加载不同的路径呢?
🌐 The simplest breakdown for what we have here is a path/component lookup. When our app loads, the router kicks things off by reading the URL the user is trying to load. In our sample, our route looks for '', which is essentially our index route. So for this, we load the LoginComponent. Fairly straight forward. This pattern of matching paths with a component continues for every entry we have in the router config. But what if we wanted to load a different path on our initial load?
处理重定向
🌐 Handling Redirects
�为此我们可以使用路由重定向。重定向的工作方式与典型的路由对象相同,只是包含一些不同的键。
🌐 For this we can use router redirects. Redirects work the same way that a typical route object does, but just includes a few different keys.
[
  { path: '', redirectTo: 'login', pathMatch: 'full' },
  { path: 'login', component: LoginComponent },
  { path: 'detail', component: DetailComponent },
];
在我们的重定向中,我们会寻找应用的索引路径。然后如果我们加载它,我们会重定向到 login 路由。pathMatch 的最后一个键是必需的,用于告诉路由它应该如何查找路径。
🌐 In our redirect, we look for the index path of our app. Then if we load that, we redirect to the login route. The last key of pathMatch is required to tell the router how it should look up the path.
因为我们使用 full,我们是在告诉路由我们应该比较完整路径,即使最终它是类似 /route1/route2/route3 的东西。这意味着如果我们有:
🌐 Since we use full, we're telling the router that we should compare the full path, even if ends up being something like /route1/route2/route3. Meaning that if we have:
{ path: '/route1/route2/route3', redirectTo: 'login', pathMatch: 'full' },
{ path: 'login', component: LoginComponent },
加载 /route1/route2/route3 时我们会重定向。但如果加载了 /route1/route2/route4,我们不会重定向,因为路径不完全匹配。
🌐 And load /route1/route2/route3 we'll redirect. But if we loaded /route1/route2/route4, we won't redirect, as the paths don't match fully.
或者,如果我们使用:
🌐 Alternatively, if we used:
{ path: '/route1/route2', redirectTo: 'login', pathMatch: 'prefix' },
{ path: 'login', component: LoginComponent },
然后加载 /route1/route2/route3 和 /route1/route2/route4,我们将被重定向到两个路由。这是因为 pathMatch: 'prefix' 只会匹配路径的一部分。
🌐 Then load both /route1/route2/route3 and /route1/route2/route4, we'll be redirected for both routes. This is because pathMatch: 'prefix' will match only part of the path.
导航到不同的路由
🌐 Navigating to different routes
谈论路由当然很好,但实际上如何导航到这些路由呢?为此,我们可以使用 routerLink 指令。让我们回过头来看看之前的简单路由设置:
🌐 Talking about routes is good and all, but how does one actually navigate to said routes? For this, we can use the routerLink directive. Let's go back and take our simple router setup from earlier:
RouterModule.forRoot([
  { path: '', component: LoginComponent },
  { path: 'detail', component: DetailComponent },
]);
现在从 LoginComponent,我们可以使用以下 HTML 导航到详细路由。
🌐 Now from the LoginComponent, we can use the following HTML to navigate to the detail route.
<ion-header>
  <ion-toolbar>
    <ion-title>Login</ion-title>
  </ion-toolbar>
</ion-header>

<ion-content class="ion-padding">
  <ion-button [routerLink]="['/detail']">Go to detail</ion-button>
</ion-content>
这里重要的部分是 ion-button 和 routerLink 指令。RouterLink 的工作原理与典型的 href 类似,但它不是将 URL 构建为字符串,而是可以作为数组来构建,这样可以提供更复杂的路径。
🌐 The important part here is the ion-button and routerLink directive. RouterLink works on a similar idea as typical hrefs, but instead of building out the URL as a string, it can be built as an array, which can provide more complicated paths.
我们还可以使用路由 API 以编程方式在我们的应用中导航。
🌐 We also can programmatically navigate in our app by using the router API.
import { Component } from '@angular/core';
import { Router } from '@angular/router';

@Component({
  ...
})
export class LoginComponent {

  constructor(private router: Router){}

  navigate(){
    this.router.navigate(['/detail'])
  }
}
两个选项都提供相同的导航机制,只是适合不同的用例。
🌐 Both options provide the same navigation mechanism, just fitting different use cases.
使用 LocationStrategy.historyGo 进行导航
🌐 Navigating using LocationStrategy.historyGo
Angular Router 有一个 LocationStrategy.historyGo 方法,允许开发者在应用历史中前进或后退。让我们来看一个示例。
🌐 Angular Router has a LocationStrategy.historyGo method that allows developers to move forward or backward through the application history. Let's take a look at an example.
假设你有以下应用历史记录:
🌐 Say you have the following application history:
/pageA --> /pageB --> /pageC
如果你在 /pageC 上调用 LocationStrategy.historyGo(-2),你将被带回到 /pageA。如果你随后调用 LocationStrategy.historyGo(2),你将被带到 /pageC。
🌐 If you were to call LocationStrategy.historyGo(-2) on /pageC, you would be brought back to /pageA. If you then called LocationStrategy.historyGo(2), you would be brought to /pageC.
LocationStrategy.historyGo() 的一个关键特性是它期望你的应用历史是线性的。这意味着 LocationStrategy.historyGo() 不应用于使用非线性路由的应用。更多信息请参见 线性路由与非线性路由。
🌐 An key characteristic of LocationStrategy.historyGo() is that it expects your application history to be linear. This means that LocationStrategy.historyGo() should not be used in applications that make use of non-linear routing. See Linear Routing versus Non-Linear Routing for more information.
延迟加载路由
🌐 Lazy loading routes
现在我们路由的当前设置方式导致它们被包含在与根 app.module 相同的块中,这并不理想。相反,路由有一种设置,可以让组件被隔离到它们自己的块中。
🌐 Now the current way our routes are setup makes it so they are included in the same chunk as the root app.module, which is not ideal. Instead, the router has a setup that allows the components to be isolated to their own chunks.
import { RouterModule } from '@angular/router';

@NgModule({
  imports: [
  ...
  RouterModule.forRoot([
    { path: '', redirectTo: 'login', pathMatch: 'full' },
    { path: 'login', loadChildren: () => import('./login/login.module').then(m => m.LoginModule) },
    { path: 'detail', loadChildren: () => import('./detail/detail.module').then(m => m.DetailModule) }
  ])
  ],
})
虽然类似,loadChildren 属性是一种通过使用原生导入而不是直接引用组件来引用模块的方式。不过,为了做到这一点,我们需要为每个组件创建一个模块。
🌐 While similar, the loadChildren property is a way to reference a module by using native import instead of a component directly. In order to do this though, we need to create a module for each of the components.
...
import { RouterModule } from '@angular/router';
import { LoginComponent } from './login.component';

@NgModule({
  imports: [
  ...
  RouterModule.forChild([
    { path: '', component: LoginComponent },
  ])
  ],
})
我们排除了一些额外的内容,只包含必要的部分。
在这里,我们有一个典型的 Angular 模块设置,以及 RouterModule 的导入,但我们现在使用 forChild 并在该设置中声明组件。通过这种设置,当我们运行构建时,我们将为应用组件、登录组件和详情组件生成单独的块。
🌐 Here, we have a typical Angular Module setup, along with a RouterModule import, but we're now using forChild and declaring the component in that setup. With this setup, when we run our build, we will produce separate chunks for both the app component, the login component, and the detail component.
独立组件
🌐 Standalone Components
独立组件允许开发者在路由上延迟加载组件,而无需向 Angular 模块声明该组件。
🌐 Standalone components allow developers to lazy load a component on a route without having to declare the component to an Angular module.
开发者可以使用现有语法从 Angular 进行独立组件路由:
🌐 Developers can use the existing syntax for standalone component routing from Angular:
@NgModule({
  imports: [
    RouterModule.forRoot([
      {
        path: 'standalone-route',
        loadComponent: () => import('./path/to/my-component.component').then((c) => c.MyComponent),
      },
    ]),
  ],
})
export class AppRoutingModule {}
如果你正在使用 routerLink、routerDirection 或 routerAction,请确保同时导入用于 Ionic 组件的 IonRouterLink 指令或用于 <a> 元素的 IonRouterLinkWithHref 指令。示例可在 Ionic Angular 构建选项文档 中找到。
要开始使用独立组件,请访问 Angular 官方文档。
🌐 To get started with standalone components visit Angular's official docs.
实例
🌐 Live Example
如果你希望亲自动手实践上面描述的概念和代码,请查看我们在 StackBlitz 上的上述主题的实时示例。
🌐 If you would prefer to get hands on with the concepts and code described above, please checkout our live example of the topics above on StackBlitz.
线性路由与非线性路由
🌐 Linear Routing versus Non-Linear Routing
线性路由
🌐 Linear Routing
如果你已经构建了一个使用路由的网页应用,你可能以前使用过线性路由。线性路由意味着你可以通过推入和弹出页面在应用历史记录中前进或后退。
🌐 If you have built a web app that uses routing, you likely have used linear routing before. Linear routing means that you can move forward or backward through the application history by pushing and popping pages.
以下是移动应用中线性路由的示例:
🌐 The following is an example of linear routing in a mobile app:
本例中的应用历史记录具有以下路径:
🌐 The application history in this example has the following path:
Accessibility --> VoiceOver --> Speech
当我们按下返回按钮时,我们遵循相同的路由路径,只是方向相反。线性路由的好处在于它允许简单且可预测的路由行为。这也意味着我们可以使用路由 Angular Router 的 API,例如 LocationStrategy.historyGo()。
🌐 When we press the back button, we follow that same routing path except in reverse. Linear routing is helpful in that it allows for simple and predictable routing behaviors. It also means we can use router Angular Router APIs such as LocationStrategy.historyGo().
线性路由的缺点是它不允许复杂的用户体验,例如选项卡视图。这就是非线性路由的用武之地。
🌐 The downside of linear routing is that it does not allow for complex user experiences such as tab views. This is where non-linear routing comes into play.
非线性路由
🌐 Non-Linear Routing
对于许多学习使用 Ionic 构建移动应用的 Web 开发者来说,非线性路由可能是一个新概念。
🌐 Non-linear routing is a concept that may be new to many web developers learning to build mobile apps with Ionic.
非线性路由意味着用户应该返回的视图不一定是屏幕上显示的前一个视图。
🌐 Non-linear routing means that the view that the user should go back to is not necessarily the previous view that was displayed on the screen.
以下是非线性路由的示例:
🌐 The following is an example of non-linear routing:
在上面的示例中,我们从 Originals 标签开始。点击一张卡片会将我们带到 Originals 标签中的 Ted Lasso 视图。
🌐 In the example above, we start on the Originals tab. Tapping a card brings us to the Ted Lasso view within the Originals tab.
从这里,我们切换到 Search 标签。然后,我们再次点击 Originals 标签,回到 Ted Lasso 视图。此时,我们已经开始使用非线性路由。
🌐 From here, we switch to the Search tab. Then, we tap the Originals tab again and are brought back to the Ted Lasso view. At this point, we have started using non-linear routing.
为什么这是非线性路由?我们之前所在的视图是 Search 视图。然而,在 Ted Lasso 视图上按返回按钮应该会带我们回到根 Originals 视图。这发生的原因是移动应用中的每个标签页都被视为自己的栈。使用标签页 部分对此有更详细的说明。
🌐 Why is this non-linear routing? The previous view we were on was the Search view. However, pressing the back button on the Ted Lasso view should bring us back to the root Originals view. This happens because each tab in a mobile app is treated as its own stack. The Working with Tabs sections goes over this in more detail.
如果点击返回按钮只是从 Ted Lasso 视图调用 LocationStrategy.historyGo(-1),我们将被带回到 Search 视图,这不正确。
🌐 If tapping the back button simply called LocationStrategy.historyGo(-1) from the Ted Lasso view, we would be brought back to the Search view which is not correct.
非线性路由允许实现线性路由无法处理的复杂用户流程。然而,某些线性路由 API(如 LocationStrategy.historyGo())无法在这种非线性环境中使用。这意味着在使用标签页或嵌套出口时,不应使用 LocationStrategy.historyGo()。
🌐 Non-linear routing allows for sophisticated user flows that linear routing cannot handle. However, certain linear routing APIs such as LocationStrategy.historyGo() cannot be used in this non-linear environment. This means that LocationStrategy.historyGo() should not be used when using tabs or nested outlets.
我应该选择哪一个?
🌐 Which one should I choose?
我们建议在需要添加非线性路由之前,将你的应用保持尽可能简单。非线性路由非常强大,但它也会给移动应用增加相当大的复杂性。
🌐 We recommend keeping your application as simple as possible until you need to add non-linear routing. Non-linear routing is very powerful, but it also adds a considerable amount of complexity to mobile applications.
非线性路由的两个最常见用途是使用标签页和嵌套的 ion-router-outlet。我们建议只有在你的应用符合标签页或嵌套路由出口的使用情况时才使用非线性路由。
🌐 The two most common uses of non-linear routing is with tabs and nested ion-router-outlets. We recommend only using non-linear routing if your application meets the tabs or nested router outlet use cases.
有关标签的更多信息,请参阅 使用标签。
🌐 For more on tabs, please see Working with Tabs.
有关嵌套路由出口的更多信息,请参见 嵌套路由。
🌐 For more on nested router outlets, please see Nested Routes.
共享 URL 与嵌套路由
🌐 Shared URLs versus Nested Routes
在设置路由时,一个常见的混淆点是决定使用共享 URL 还是嵌套路由。本指南的这一部分将解释两者,并帮助你决定使用哪一个。
🌐 A common point of confusion when setting up routing is deciding between shared URLs or nested routes. This part of the guide will explain both and help you decide which one to use.
共享网址
🌐 Shared URLs
共享 URL 是一种路由配置,其中路由具有共同的 URL 部分。以下是共享 URL 配置的示例:
🌐 Shared URLs is a route configuration where routes have pieces of the URL in common. The following is an example of a shared URL configuration:
const routes: Routes = [
  {
    path: 'dashboard',
    component: DashboardMainPage,
  },
  {
    path: 'dashboard/stats',
    component: DashboardStatsPage,
  },
];
上述路由被认为是“共享”的,因为它们重用了 URL 中的 dashboard 部分。
🌐 The above routes are considered "shared" because they reuse the dashboard piece of the URL.
嵌套路由
🌐 Nested Routes
嵌套路由是一种路由配置,其中路由被列为其他路由的子路由。以下是一个嵌套路由配置的示例:
🌐 Nested Routes is a route configuration where routes are listed as children of other routes. The following is an example of a nested route configuration:
const routes: Routes = [
  {
    path: 'dashboard',
    component: DashboardRouterOutlet,
    children: [
      {
        path: '',
        component: DashboardMainPage,
      },
      {
        path: 'stats',
        component: DashboardStatsPage,
      },
    ],
  },
];
上述路由是嵌套的,因为它们位于父路由的 children 数组中。请注意,父路由渲染了 DashboardRouterOutlet 组件。当你嵌套路由时,你需要渲染另一个 ion-router-outlet 的实例。
🌐 The above routes are nested because they are in the children array of the parent route. Notice that the parent route renders the DashboardRouterOutlet component. When you nest routes, you need to render another instance of ion-router-outlet.
我应该选择哪一个?
🌐 Which one should I choose?
共享的 URL 非常适合在希望从页面 A 过渡到页面 B 的同时保留两个页面之间关系的情况。在我们之前的示例中,/dashboard 页面上的一个按钮可以过渡到 /dashboard/stats 页面。两个页面之间的关系得以保留,因为 a) 页面过渡 和 b) URL。
🌐 Shared URLs are great when you want to transition from page A to page B while preserving the relationship between the two pages in the URL. In our previous example, a button on the /dashboard page could transition to the /dashboard/stats page. The relationship between the two pages is preserved because of a) the page transition and b) the url.
当你想在渲染出口 A 的内容的同时,也在嵌套出口 B 内渲染子内容时,应使用嵌套路由。你最常遇到的用例是选项卡。当你加载一个选项卡的 Ionic 启动应用时,你会看到 ion-tab-bar 和 ion-tabs 组件渲染在第一个 ion-router-outlet 中。ion-tabs 组件渲染另一个 ion-router-outlet,它负责渲染每个选项卡的内容。
🌐 Nested routes should be used when you want to render content in outlet A while also rendering sub-content inside of a nested outlet B. The most common use case you will run into is tabs. When you load up a tabs Ionic starter application, you will see ion-tab-bar and ion-tabs components rendered in the first ion-router-outlet. The ion-tabs component renders another ion-router-outlet which is responsible for rendering the contents of each tab.
在移动应用中,嵌套路由合理的用例非常少。如果不确定,请使用共享的 URL 路由配置。我们强烈建议除了标签页之外的上下文不要使用嵌套路由,因为它可能会迅速使你的应用导航变得混乱。
🌐 There are very few use cases in which nested routes make sense in mobile applications. When in doubt, use the shared URL route configuration. We strongly caution against using nested routing in contexts other than tabs as it can quickly make navigating your app confusing.
使用选项卡
🌐 Working with Tabs
使用 Tabs 时,Angular 路由为 Ionic 提供了知道应加载哪些组件的机制,但实际的重工作实际上是由 tabs 组件完成的。让我们来看一个简单的例子。
🌐 With Tabs, the Angular Router provides Ionic the mechanism to know what components should be loaded, but the heavy lifting is actually done by the tabs component. Let's look at a simple example.
const routes: Routes = [
  {
    path: 'tabs',
    component: TabsPage,
    children: [
      {
        path: 'tab1',
        children: [
          {
            path: '',
            loadChildren: () => import('../tab1/tab1.module').then((m) => m.Tab1PageModule),
          },
        ],
      },
      {
        path: '',
        redirectTo: '/tabs/tab1',
        pathMatch: 'full',
      },
    ],
  },
  {
    path: '',
    redirectTo: '/tabs/tab1',
    pathMatch: 'full',
  },
];
这里我们有一个我们加载的“tabs”路径。在这个示例中,我们将路径命名为“tabs”,但路径的名称可以更改。它们可以被命名为适合你应用的任何名称。在该路由对象中,我们也可以定义一个子路由。在这个示例中,顶层子路由“tab1”作为我们的“outlet”,并且可以加载额外的子路由。对于这个示例,我们有一个单独的子子路由,它只是加载一个新组件。该选项卡的标记如下:
🌐 Here we have a "tabs" path that we load. In this example we call the path "tabs", but the name of the paths can be changed. They can be called whatever fits your app. In that route object, we can define a child route as well. In this example, the top level child route "tab1" acts as our "outlet", and can load additional child routes. For this example, we have a single sub-child-route, which just loads a new component. The markup for the tab is as follows:
<ion-tabs>
  <ion-tab-bar slot="bottom">
    <ion-tab-button tab="tab1">
      <ion-icon name="flash"></ion-icon>
      <ion-label>Tab One</ion-label>
    </ion-tab-button>
  </ion-tab-bar>
</ion-tabs>
如果你以前使用 Ionic 构建过应用,这应该会感觉很熟悉。我们创建一个 ion-tabs 组件,并提供一个 ion-tab-bar。ion-tab-bar 提供一个带有 tab 属性的 ion-tab-button,该属性与路由配置中的标签“outlet”相关。请注意,最新版本的 @ionic/angular 不再需要 <ion-tab>,而是允许开发者完全自定义标签栏,并且唯一的真实来源存在于路由配置中。
🌐 If you've built apps with Ionic before, this should feel familiar. We create a ion-tabs component, and provide a ion-tab-bar. The ion-tab-bar provides a ion-tab-button with a tab property that is associated with the tab "outlet" in the router config. Note that the latest version of @ionic/angular no longer requires <ion-tab>, but instead allows developers to fully customize the tab bar, and the single source of truth lives within the router configuration.
Ionic 中的选项卡工作原理
🌐 How Tabs in Ionic Work
Ionic 中的每个标签都被视为一个独立的导航栈。这意味着如果你的应用中有三个标签,每个标签都有其自己的导航栈。在每个栈中,你可以向前导航(推入一个视图)和向后导航(弹出一个视图)。
🌐 Each tab in Ionic is treated as an individual navigation stack. This means if you have three tabs in your application, each tab has its own navigation stack. Within each stack you can navigate forwards (push a view) and backwards (pop a view).
需要注意这种行为,因为它不同于大多数其他基于网页的 UI 库中发现的标签实现。其他库通常将标签管理为一个单一的历史堆栈。
🌐 This behavior is important to note as it is different than most tab implementations that are found in other web based UI libraries. Other libraries typically manage tabs as one single history stack.
由于 Ionic 专注于帮助开发者构建移动应用,因此 Ionic 中的标签页设计尽可能地与原生移动标签页相匹配。因此,Ionic 的标签页可能会存在某些行为,与你在其他 UI 库中见过的标签页实现有所不同。请继续阅读以了解更多关于这些差异的信息。
🌐 Since Ionic is focused on helping developers build mobile apps, the tabs in Ionic are designed to match native mobile tabs as closely as possible. As a result, there may be certain behaviors in Ionic's tabs that differ from tabs implementations you have seen in other UI libraries. Read on to learn more about some of these differences.
选项卡中的子路由
🌐 Child Routes within Tabs
在向标签页添加额外路由时,你应该将它们写为与父标签页同级的路由,并将父标签页作为路径前缀。下面的示例将 /tabs/tab1/view 路由定义为 /tabs/tab1 路由的同级路由。由于这个新路由具有 tab1 前缀,它将渲染在 Tabs 组件内,并且在 ion-tab-bar 中标签 1 仍将被选中。
🌐 When adding additional routes to tabs you should write them as sibling routes with the parent tab as the path prefix. The example below defines the /tabs/tab1/view route as a sibling of the /tabs/tab1 route. Since this new route has the tab1 prefix, it will be rendered inside of the Tabs component, and Tab 1 will still be selected in the ion-tab-bar.
const routes: Routes = [
  {
    path: 'tabs',
    component: TabsPage,
    children: [
      {
        path: 'tab1',
        children: [
          {
            path: '',
            loadChildren: () => import('../tab1/tab1.module').then((m) => m.Tab1PageModule),
          },
        ],
      },
      {
        path: 'tab1/view',
        children: [
          {
            path: '',
            loadChildren: () => import('../tab1/tab1view.module').then((m) => m.Tab1ViewPageModule),
          },
        ],
      },
      {
        path: 'tab2',
        children: [
          {
            path: '',
            loadChildren: () => import('../tab2/tab2.module').then((m) => m.Tab2PageModule),
          },
        ],
      },
      {
        path: 'tab3',
        children: [
          {
            path: '',
            loadChildren: () => import('../tab3/tab3.module').then((m) => m.Tab3PageModule),
          },
        ],
      },
    ],
  },
  {
    path: '',
    redirectTo: '/tabs/tab1',
    pathMatch: 'full',
  },
];
在选项卡之间切换
🌐 Switching Between Tabs
由于每个标签页都有自己的导航堆栈,因此需要注意,这些导航堆栈永远不应相互交互。这意味着在标签页1中不应有将用户引导到标签页2的按钮。换句话说,标签页的切换应仅通过用户点击标签栏中的标签按钮来进行。
🌐 Since each tab is its own navigation stack, it is important to note that these navigation stacks should never interact. This means that there should never be a button in Tab 1 that routes a user to Tab 2. In other words, tabs should only be changed by the user tapping a tab button in the tab bar.
在实践中的一个很好的例子是 iOS App Store 和 Google Play Store 移动应用。这些应用都提供了标签界面,但没有一个会将用户跨标签引导。例如,iOS App Store 应用中的“游戏”标签从不将用户引导到“搜索”�标签,反之亦然。
🌐 A good example of this in practice is the iOS App Store and Google Play Store mobile applications. These apps both provide tabbed interfaces, but neither one ever routes the user across tabs. For example, the "Games" tab in the iOS App Store app never directs users to the "Search" tab and vice versa.
让我们看一下使用选项卡时常犯的几个常见错误。
🌐 Let's take a look at a couple common mistakes that are made with tabs.
一个被多个标签引用的设置标签
一种常见的做法是将设置视图创建为其自己的标签页。如果开发者需要展示多个嵌套的设置菜单,这是非常好的。然而,其他标签页绝不应该尝试跳转到设置标签页。如上所述,设置标签页唯一应被激活的方式是用户点击相应的标签按钮。
🌐 A common practice is to create a Settings view as its own tab. This is great if developers need to present several nested settings menus. However, other tabs should never try to route to the Settings tab. As we mentioned above, the only way that the Settings tab should be activated is by a user tapping the appropriate tab button.
如果你发现你的标签需要引用“设置”标签,我们建议通过使用 ion-modal 将“设置”视图设为模态。这是在 iOS App Store 应用中常见的做法。通过这种方式,任何标签都可以渲染模态,而不会破坏每个标签各自成为独立堆栈的移动标签模式。
🌐 If you find that your tabs need to reference the Settings tab, we recommend making the Settings view a modal by using ion-modal. This is a practice found in the iOS App Store app. With this approach, any tab can present the modal without breaking the mobile tabs pattern of each tab being its own stack.
下面的示例显示了 iOS 应用商店应用如何处理从多个标签页渲染“账户”视图。通过以模态方式渲染“账户”视图,应用可以在移动标签页的最佳实践范围内在多个标签页中显示相同的视图。
🌐 The example below shows how the iOS App Store app handles presenting an "Account" view from multiple tabs. By presenting the "Account" view in a modal, the app can work within the mobile tabs best practices to show the same view across multiple tabs.
在标签页之间重用视图
另一种常见做法是将相同的视图渲染在多个标签页中。开发者经常尝试通过将视图包含在单个标签页中,而其他标签页路由到该标签页来实现这一点。如上文所述,这会破坏移动标签页的模式,应当避免。
🌐 Another common practice is to present the same view in multiple tabs. Developers often try to do this by having the view contained in a single tab, with other tabs routing to that tab. As we mentioned above, this breaks the mobile tabs pattern and should be avoided.
相反,我们建议在每个标签中设置引用相同组件的路由。这是在像 Spotify 这样的流行应用中使用的做法。例如,你可以从“首页”、“搜索”和“你的资料库”标签访问专辑或播客。当访问专辑或播客时,用户仍停留在该标签中。应用通过为每个标签创建路由并在代码库中共享一个通用组件来实现这一点。
🌐 Instead, we recommend having routes in each tab that reference the same component. This is a practice done in popular apps like Spotify. For example, you can access an album or podcast from the "Home", "Search", and "Your Library" tabs. When accessing the album or podcast, users stay within that tab. The app does this by creating routes per tab and sharing a common component in the codebase.
下面的示例展示了 Spotify 应用如何重用��相同的专辑组件在多个标签中显示内容。请注意,每个截图显示的是相同的专辑,但来自不同的标签。
🌐 The example below shows how the Spotify app reuses the same album component to show content in multiple tabs. Notice that each screenshot shows the same album but from a different tab.
| 首页标签 | 搜索标签 |
|---|---|
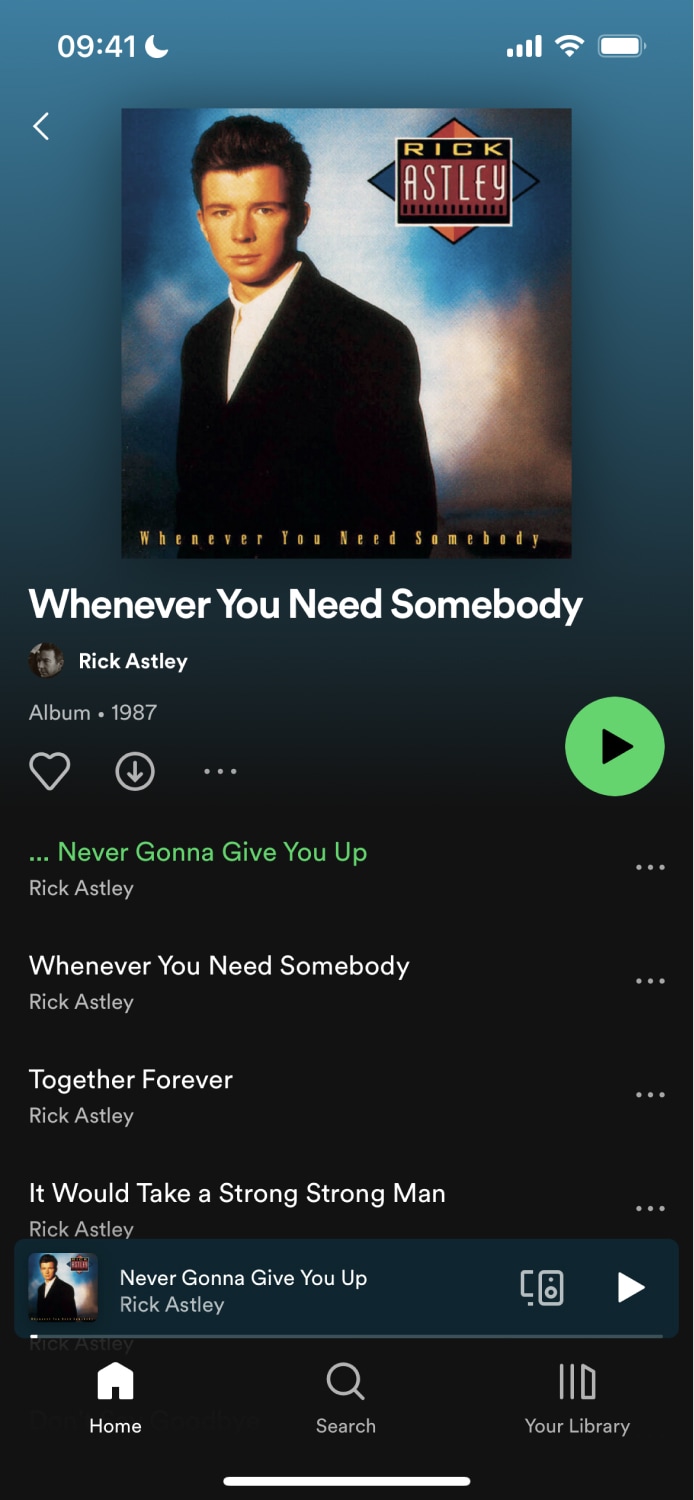 | 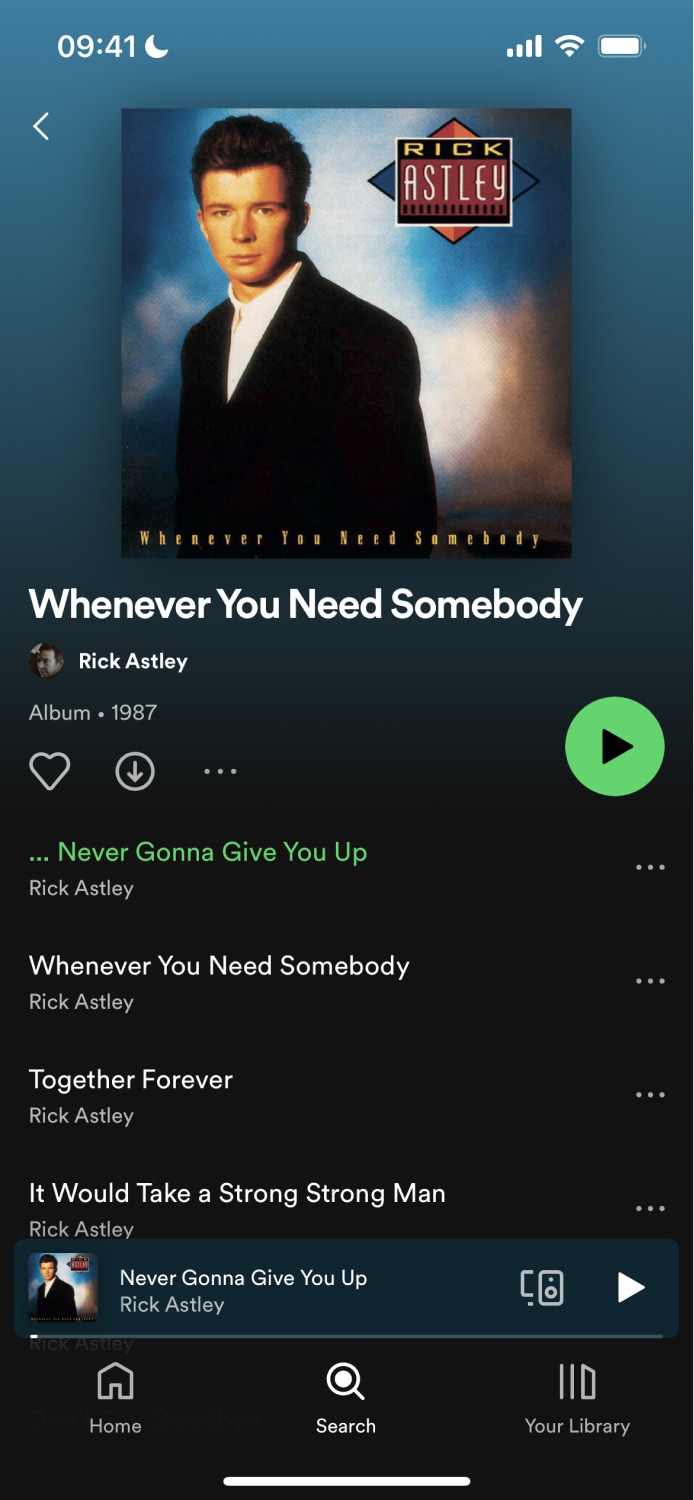 |